Command Pattern
Command pattern က behavioral design pattern တစ်ခုပါ။

Invoker က action တစ်ခု လုပ်လိုက်သည့် အခါမှာ သက်ဆိုင်ရာ command က receiver ရဲ့ action ကို သွားပြီး ခိုင်းမှာပါ။ ဥပမာ Text-Editor app တစ်ခု ဖန်တီးသည့် အခါမှာ toolbar မှာ buttons တွေ အများကြီး ရှိပါလိမ့်မယ်။ Copy, Paste, Undo, Redo စသည့် button တွေ အများကြီး ရှိပါတယ်။ Save လုပ်ဖို့ အတွက် Button ကနေ ရှိနိုင်တယ်။ Menu ကနေ ရှိနိုင်တယ်။ Shortcut ကနေလည်း ရှိနိုင်ပါတယ်။ Button တစ်ခု ဆီကနေ function ခေါ်မယ့် စား SaveCommand ဆိုပြီး command pattern နဲ့ ရေးတာ ပိုအဆင်ပြေပါမယ်။
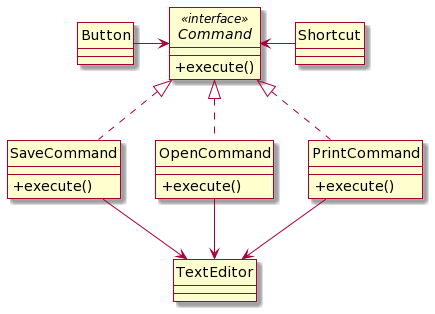
ပုံမှာ ဆိုရင် Button နဲ့ Shortcut က Command Interface ကနေ တဆင့် execute လုပ်တော့မယ့် အပိုင်းပဲ ရှိပါတော့တယ်။ Command တိုင်းမှာ execute function ပါပြီး သက်ဆိုင်ရာ Function ကို execute လုပ်သွားမှာပါ။
Java code ကို ကြည့်ရအောင်။
Command.java
public interface Command {
    void execute();
}
SaveCommand.java
public class SaveCommand implements Command {
    private TextEditor textEditor;

    public SaveCommand(TextEditor textEditor) {
        this.textEditor = textEditor;
    }

    @Override
    public void execute() {
        textEditor.save();
    }
}
OpenCommand.java
public class OpenCommand implements Command {
    private TextEditor textEditor;

    public OpenCommand(TextEditor textEditor) {
        this.textEditor = textEditor;
    }

    @Override
    public void execute() {
        textEditor.open();
    }
}
PrintCommand.java
public class PrintCommand implements Command {
    private TextEditor textEditor;

    public PrintCommand(TextEditor textEditor) {
        this.textEditor = textEditor;
    }

    @Override
    public void execute() {
        textEditor.print();
    }
}
TextEditor.java
public class TextEditor {
    public void save() {
        System.out.println("Saving the document.");
        // Save implementation here
    }

    public void open() {
        System.out.println("Opening a document.");
        // Open implementation here
    }

    public void print() {
        System.out.println("Printing the document.");
        // Print implementation here
    }
}
Button.java
public class Button {
    private Command command;

    public Button(Command command) {
        this.command = command;
    }

    public void click() {
        command.execute();
    }
}
Shortcut.java
public class Shortcut {
    private Command command;

    public Shortcut(Command command) {
        this.command = command;
    }

    public void press() {
        command.execute();
    }
}
Client.java
public class Client {
    public static void main(String[] args) {
        TextEditor textEditor = new TextEditor();

        // Create command objects and associate them with the receiver
        Command saveCommand = new SaveCommand(textEditor);
        Command openCommand = new OpenCommand(textEditor);
        Command printCommand = new PrintCommand(textEditor);

        // Create sender objects (buttons or shortcuts)
        Button saveButton = new Button(saveCommand);
        Button openButton = new Button(openCommand);
        Shortcut printShortcut = new Shortcut(printCommand);

        // Simulate the user clicking the buttons or using shortcuts
        saveButton.click();
        openButton.click();
        printShortcut.press();
    }
}
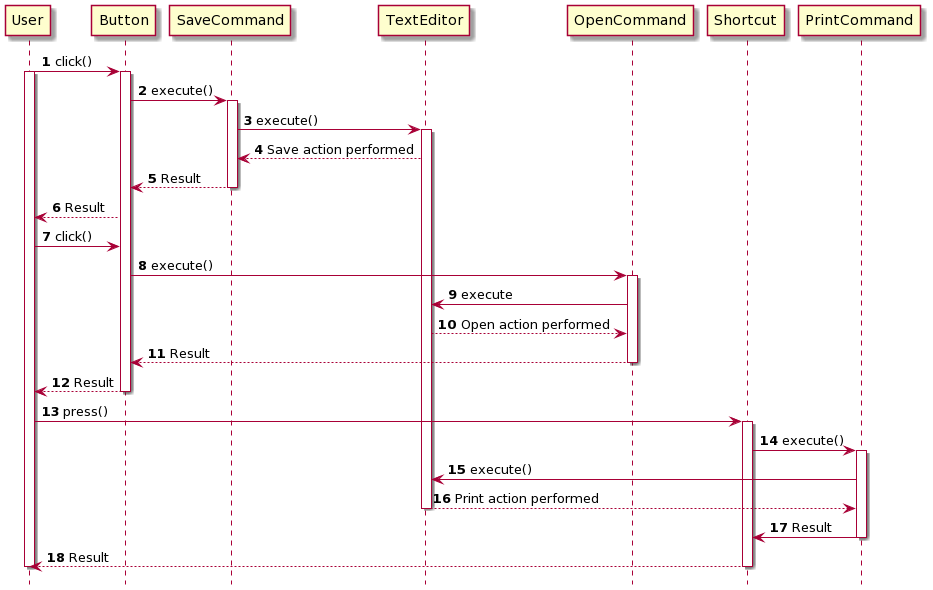
ဒီ Code လေးကို ကြည့်လိုက်ရင် သဘောပေါက်လွယ်မှာပါ။
Command Pattern မှာ
- Invoker
- Command
- Concrete Command
- Receiver
ဆိုပြီး ရှိပါတယ်။
Button, Shortcut တို့က Invoker ပါ။ သူတို့က command ကို invoke လုပ်မယ့်သူတွေပါ။ Command interface ကတော့ Command ဖြစ်ပြီး execute လုပ်မယ့် အပိုင်းပဲ ပါဝင်ပါတယ်။ SaveCommand, PrintCommand, OpenCommand တွေကတော့ Concrete Command ပါ။ TextEditor ကတော့ Receiver ပါ။ Command တွေက Receiver ရဲ့ operation တွေကို လှမ်းခေါ်မှာပါ။
Command Pattern with History
Command Pattern က Undo/Redo လုပ်ချင်သည့် pattern တွေမှာလည်း အသုံးပြုနိုင်ပါတယ်။ Command Pattern ဟာ command history တွေကို stack ထဲထည့်ပြီး ပြန်ထုတ်သည့် အခါမှာ Undo/Redo တွေ ဖန်တီးလို့ရပါပြီ။
ဥပမာ stack ကို ကြည့်ရအောင်။ Push နဲ့ Pop ပါမယ်။
- Push ကို undo လုပ်ရင် pop ဖြစ်ပြီး redo ပြန်လုပ်ရင် push ပြန်ဖြစ်မယ်။
- Pop ကို undo လုပ်ရင် push ဖြစ်ပြီး redo ပြန်လုပ်ရင် pop ဖြစ်ပါမယ်။
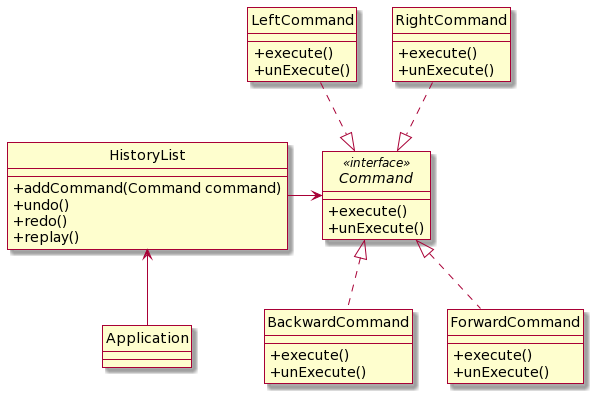
Class Diagram ကို ကြည့်ရအောင်။

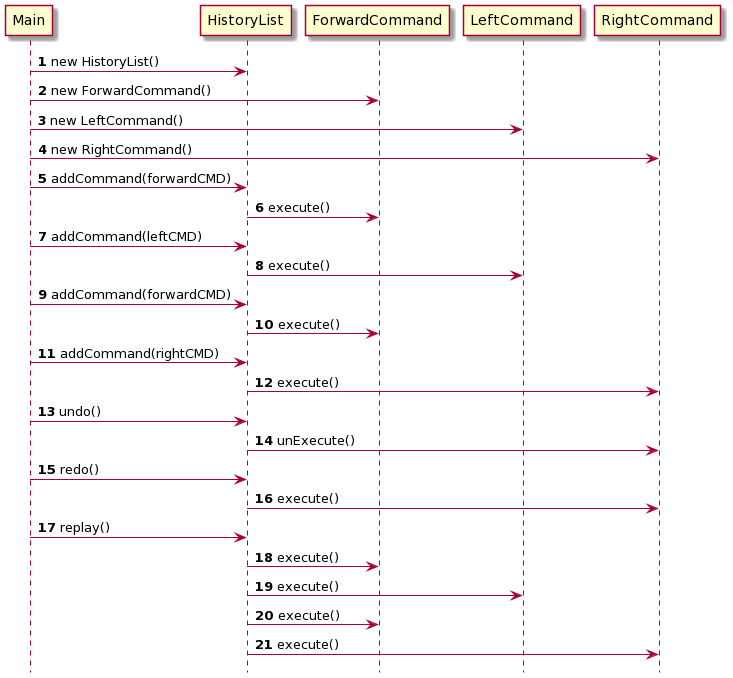
လုပ်ဆောင်မည့်ပုံကို sequence diagram ကို ကြည့်ပြီး သိနိုင်ပါတယ်။

Sequence Diagram မှာ Push Command ကို create လုပ်လိုက်တယ်။ပြီးရင် Application ကနေ တဆင့် History List ထဲကို ထည့်သွားတာ တွေ့နိုင်ပါတယ်။ Pop Command လည်း ထိုနည်း တူပါပဲ။ Undo လုပ်သည့် အခါမှာ PopCommand ရဲ့ unexecute ကို ခေါ်သွားပြီး redo လုပ်သည့် အခါမှာ PopCommand ရဲ့ execute ကို ပြန်ခေါ်သွားပါတယ်။
Code အပိုင်း ကို စဥ်းစားကြည့်ရအောင်။
HistoryList မှာ Undo နဲ့ Redo အတွက် ArrayList ၂ ခု ရှိဖို့ လိုပါတယ်။ ဒါမှသာ undo နှင့် redo ပြန်လုပ်လို့ရမှာပါ။ Code အစ အဆုံး ကို လေ့လာကြည့်ရအောင်။
Command.java
public interface Command {
    void execute();
    void unExecute();
}
PushCommand.java
public class PushCommand implements Command{
    Stack<Integer> stack;
    Integer i;

    public PushCommand(Stack<Integer> stack, Integer i) {
        this.stack = stack;
        this.i = i;
    }

    public void execute(){
        stack.push(i);
    }

    public void unExecute(){
        stack.pop();
    }
}
PopCommand.java
public class PopCommand implements Command{
    Stack<Integer> stack;
    Integer i;

    public PopCommand(Stack<Integer> stack) {
        this.stack = stack;
    }

    public void execute(){
        i = stack.isEmpty() ? null : stack.pop();
    }

    public void unExecute(){
        if (i != null) {
            stack.push(i);
        }
    }
}
HistoryList.java
public class HistoryList {
    private List<Command> commandList = new ArrayList<>();
    private List<Command> undoList = new ArrayList<>();

    public void undo() {
        if (!commandList.isEmpty()) {
            Command commandObject = commandList.remove(commandList.size() - 1);
            commandObject.unExecute();
            undoList.add(commandObject);
        }
    }

    public void redo() {
        if (!undoList.isEmpty()) {
            Command commandObject = undoList.remove(undoList.size() - 1);
            commandObject.execute();
            commandList.add(commandObject);
        }
    }

    public void addCommand(Command commandObject) {
        commandList.add(commandObject);
    }
}
Application.java
public class Application {

    public static void main(String[] args) {
        Stack<Integer> stack = new Stack<>();
        HistoryList hlist = new HistoryList();

        PushCommand pushc1 = new PushCommand(stack, 6);
        pushc1.execute();
        hlist.addCommand(pushc1);
        System.out.println(stack);

        PushCommand pushc2 = new PushCommand(stack, 3);
        pushc2.execute();
        hlist.addCommand(pushc2);
        System.out.println(stack);

        PopCommand popc1 = new PopCommand(stack);
        popc1.execute();
        hlist.addCommand(popc1);
        System.out.println(stack);

        hlist.undo();
        System.out.println(stack);
    }
}
Replay
Command Pattern ကို reply အနေနဲ့လည်း အသုံးပြုလို့ရပါတယ်။ ဥပမာ Game တစ်ခု မှာ သွားခဲ့သည့် command တွေကို reply ပြန်ပြချင်တယ် ဆိုရင် Command Pattern ကို အသုံးပြုနိုင်ပါတယ်။ History class မှာ undo, redo အပြင် replay ပါ ပါလာသည့် အတွက် ရေးသားရသည့် ပုံစံ ပြောင်းသွားပါတယ်။
ဥပမာ
- Forward()
- Forward()
- Left()
- Forward()
- Right()
- Backward()
ကို reply ပြန်လုပ်ရ command တွေကို အစ ကနေ ပြန် run ပေးရမှာပါ။ Undo, Redo နဲ့ ဖြေရှင်းလို့ မရတော့ပါဘူး။
ဒီတော့ လက်ရှိရှိ နေသည့် history class မှာ ရှိသည့် ့Array ကို reply ပြန်လုပ်သည့် အခါမှာ အခန်း သုည က နေ စပြီး ပြန် ခေါ်ပေးဖို့ လိုပါတယ်။
Class Diagram ကို ကြည့်ရအောင်။
Sequence Diagram အရဆိုရင်
Sequence diagram ကြည့်ပြီးရင် code ကို ပြန်ရေးလို့ရပါပြီ။
Command.java
// Command interface
interface Command {
    void execute();
    void unExecute();
}
ForwardCommand.java
// Concrete commands
class ForwardCommand implements Command {
    public void execute() {
        System.out.println("forward");
    }
    public void unExecute() {
        System.out.println("undo forward");
    }
}
BackwardCommand.java
class BackwardCommand implements Command {
    public void execute() {
        System.out.println("backward");
    }
    public void unExecute() {
        System.out.println("undo backward");
    }
}
LeftCommand.java
class LeftCommand implements Command {
    public void execute() {
        System.out.println("left");
    }
    public void unExecute() {
        System.out.println("undo left");
    }
}
RightCommand.java
class RightCommand implements Command {
    public void execute() {
        System.out.println("right");
    }
    public void unExecute() {
        System.out.println("undo right");
    }
}
HistoryList.java
// HistoryList class
class HistoryList {
    private List<Command> commands = new ArrayList<>();
    private int current = 0;

    public void addCommand(Command command) {
        commands.add(command);
        command.execute();
        current++;
    }

    public void undo() {
        if (current > 0) {
            commands.get(--current).unExecute();
        }
    }

    public void redo() {
        if (current < commands.size()) {
            commands.get(current++).execute();
        }
    }

    public void replay() {
        for (Command command : commands) {
            command.execute();
        }
    }
}
Main.java
// Usage
public class Main {
    public static void main(String[] args) {
        HistoryList history = new HistoryList();
        Command forwardCMD = new ForwardCommand();
        Command backwardCMD = new BackwardCommand();
        Command leftCMD = new LeftCommand();
        Command rightCMD = new RightCommand();

        history.addCommand(forwardCMD);
        history.addCommand(leftCMD);
        history.addCommand(forwardCMD);
        history.addCommand(rightCMD);

        history.undo();  // Outputs: undo right
        history.redo();  // Outputs: right
        history.replay();  // Outputs: forward, left, forward, right
    }
}
Pros and Cons
ကောင်းတာတွေကတော့
- Single Responsibility Principle ကို လိုက်နာ ထားတယ်။
- Open/Close Principle ကိုလည်း လိုက်နာ ပါတယ်။
- Complex ဖြစ်သည့် system အတွက် ရိုးရှင်း Commands တွေ စုစည်းပြီး ရေးသားနိုင်ပါတယ်။ ဥပမာ TextEditor ရဲ့ Toolbar button တွေလိုမျိုးပေါ့။
မကောင်းတာကတော့
- Code က ပိုပြီး complicated ဖြစ်သွားနိုင်တယ်။ Sender နဲ့ Receiver ကြားမှာ နောက်ထပ် layer တစ်ခု ပါလာသလို ဖြစ်သွားတာပါ။